Buildroot State for AM62x

Dimitri Mizenko

Dimitri Mizenko – Embedded Software Developer

Buildroot State for AM62x

At the start of each project, we evaluate with our customers what kind of platform they are going to need. If it’s a small device, maybe even battery powered, with little need for performance or bandwidth, we usually opt for the nRF52 series or nRF9160 microcontrollers, depending on the connectivity requirements. These already pack a lot of punch, but if we find that even more performance, a more complex software, or a fast Ethernet or LTE connection is required, we recommend using the grandcentrix Linux Gateway Blueprint. This is our own pre-engineered single board computer that we customize for the specific customer requirements. It features a SAMA5 CPU by Microchip. While this has been our reliable workhorse for many years, the embedded CPU market has developed a lot. It was time for us to find a new CPU that would be even faster and could be equipped with more RAM to enable us to create the IoT gateway for tomorrow.

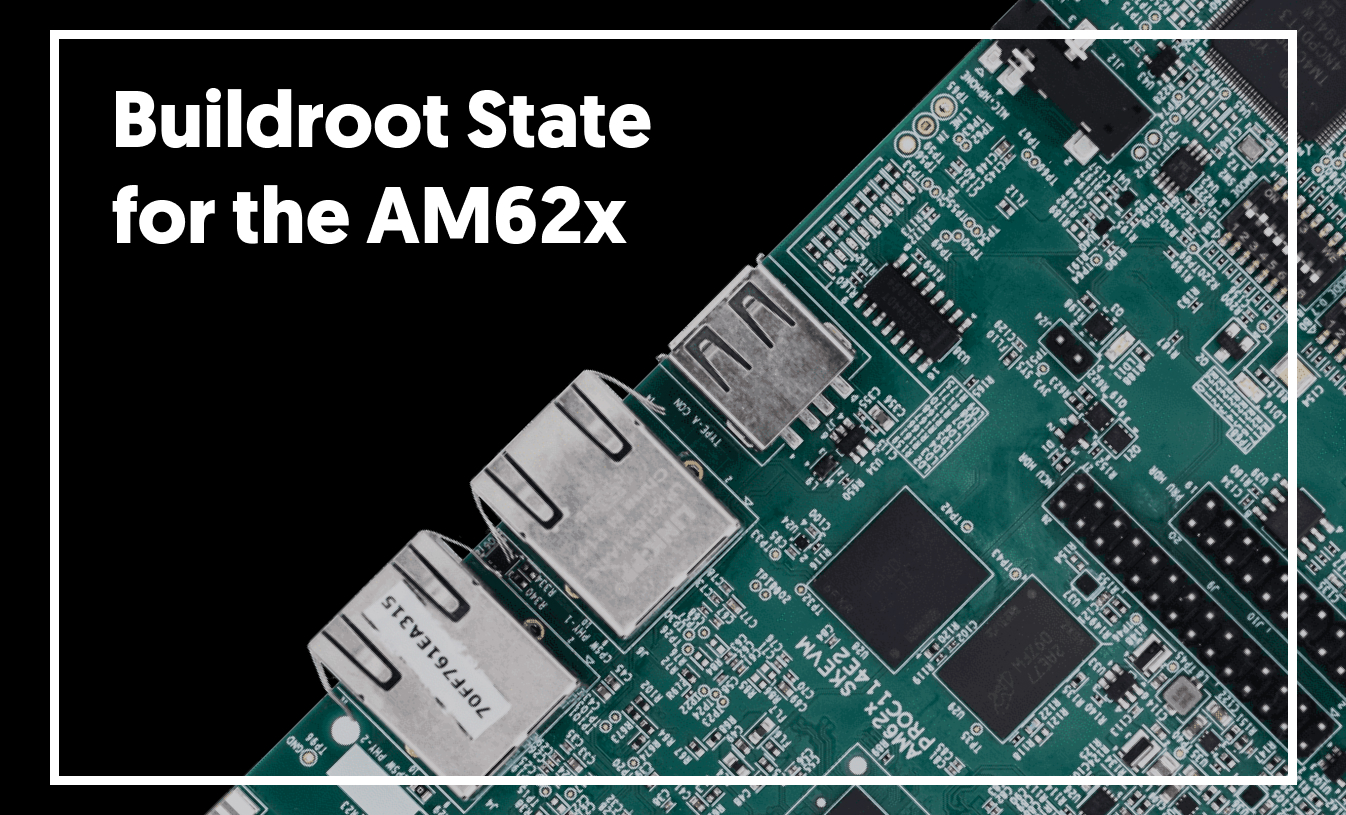
We found a worthy successor in the brand new AM62x platform by Texas Instruments. It comes in four footprint-compatible variants with 1, 2 or 4 cores, running at up to 1.4 GHz. This enables us to engineer one blueprint that can be scaled up or down according to our customer’s requirements.

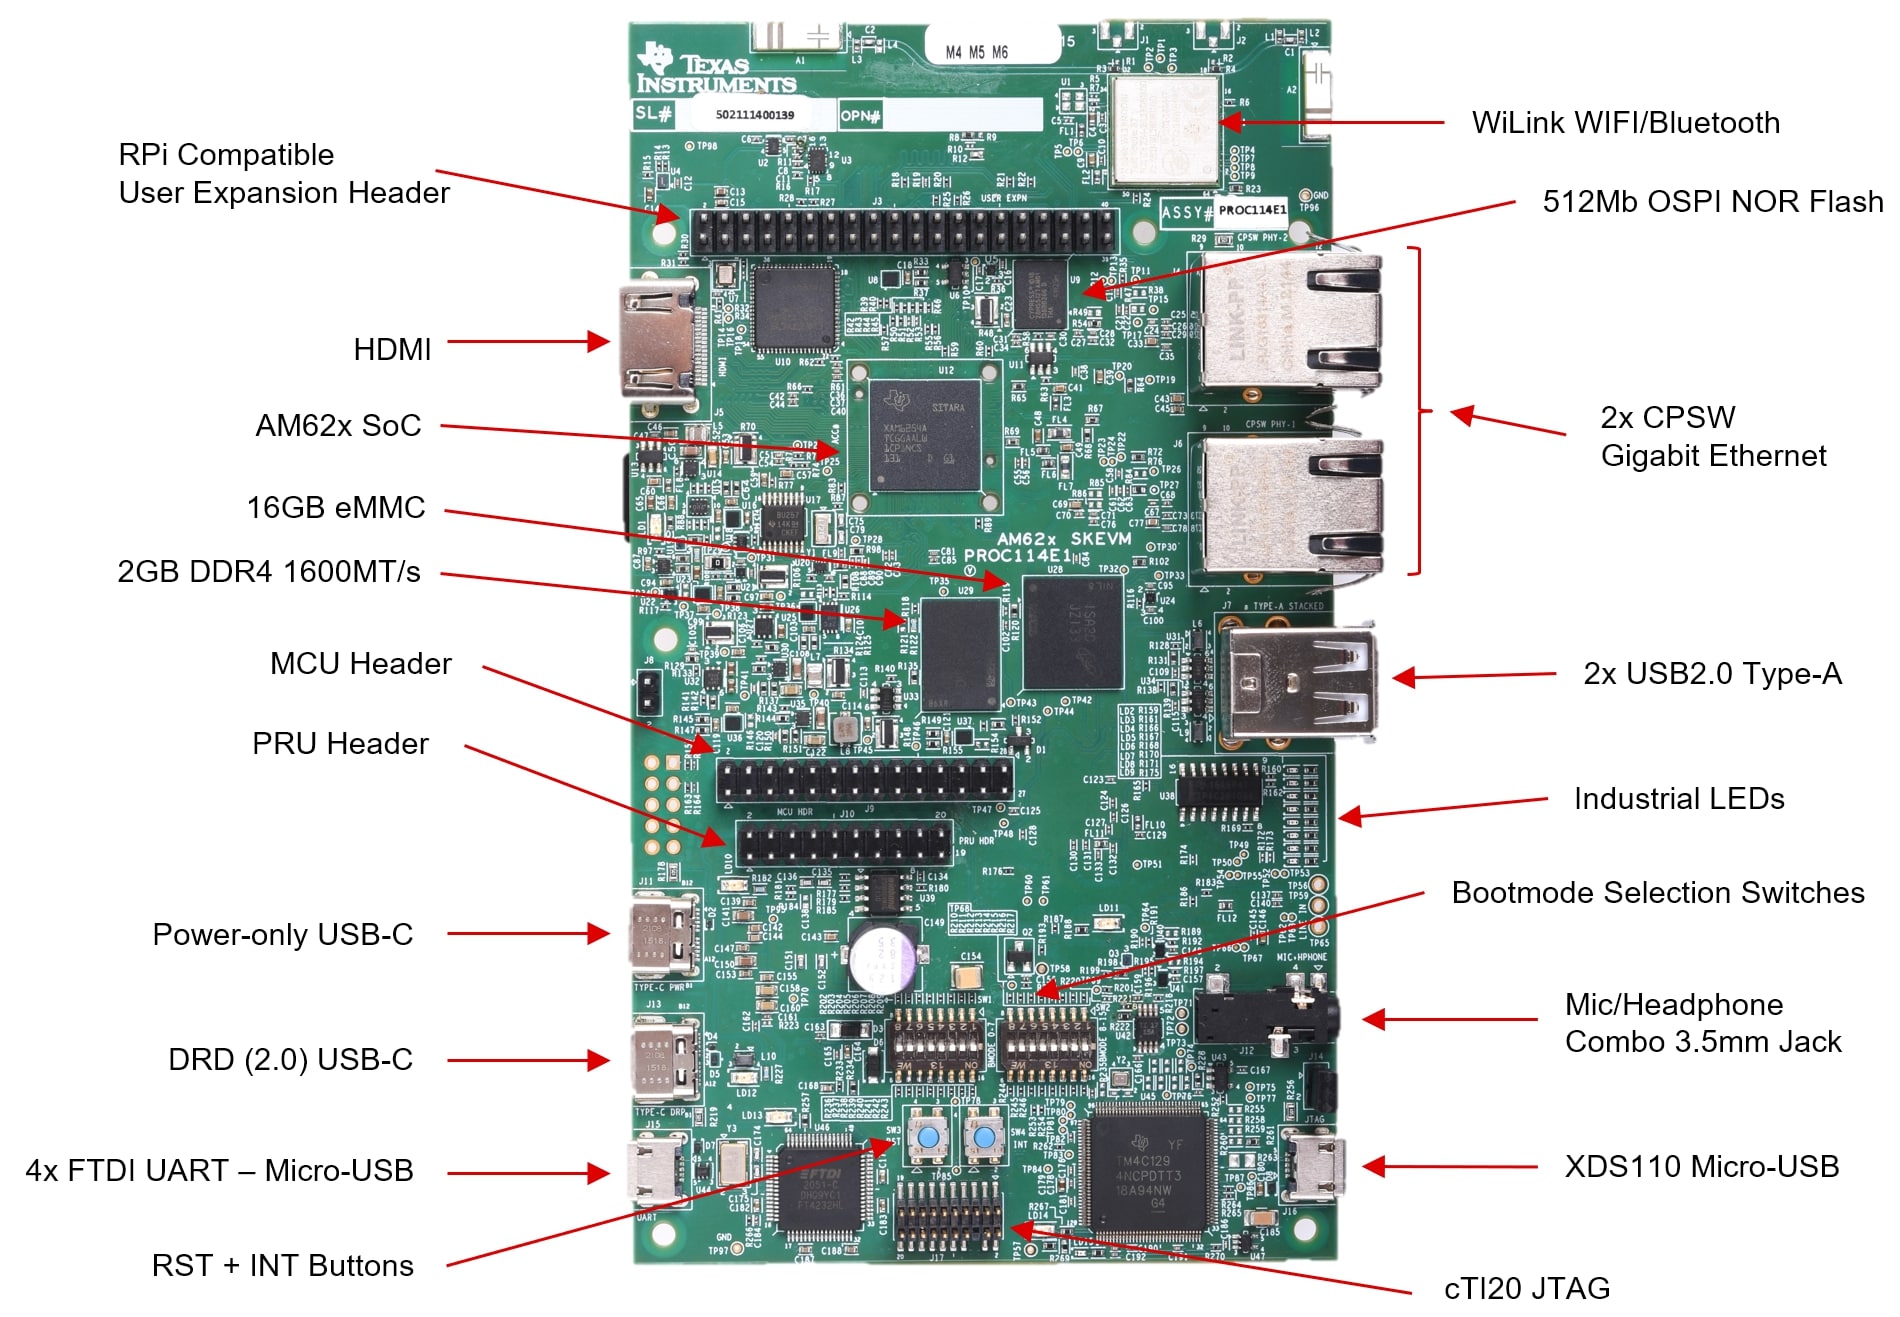
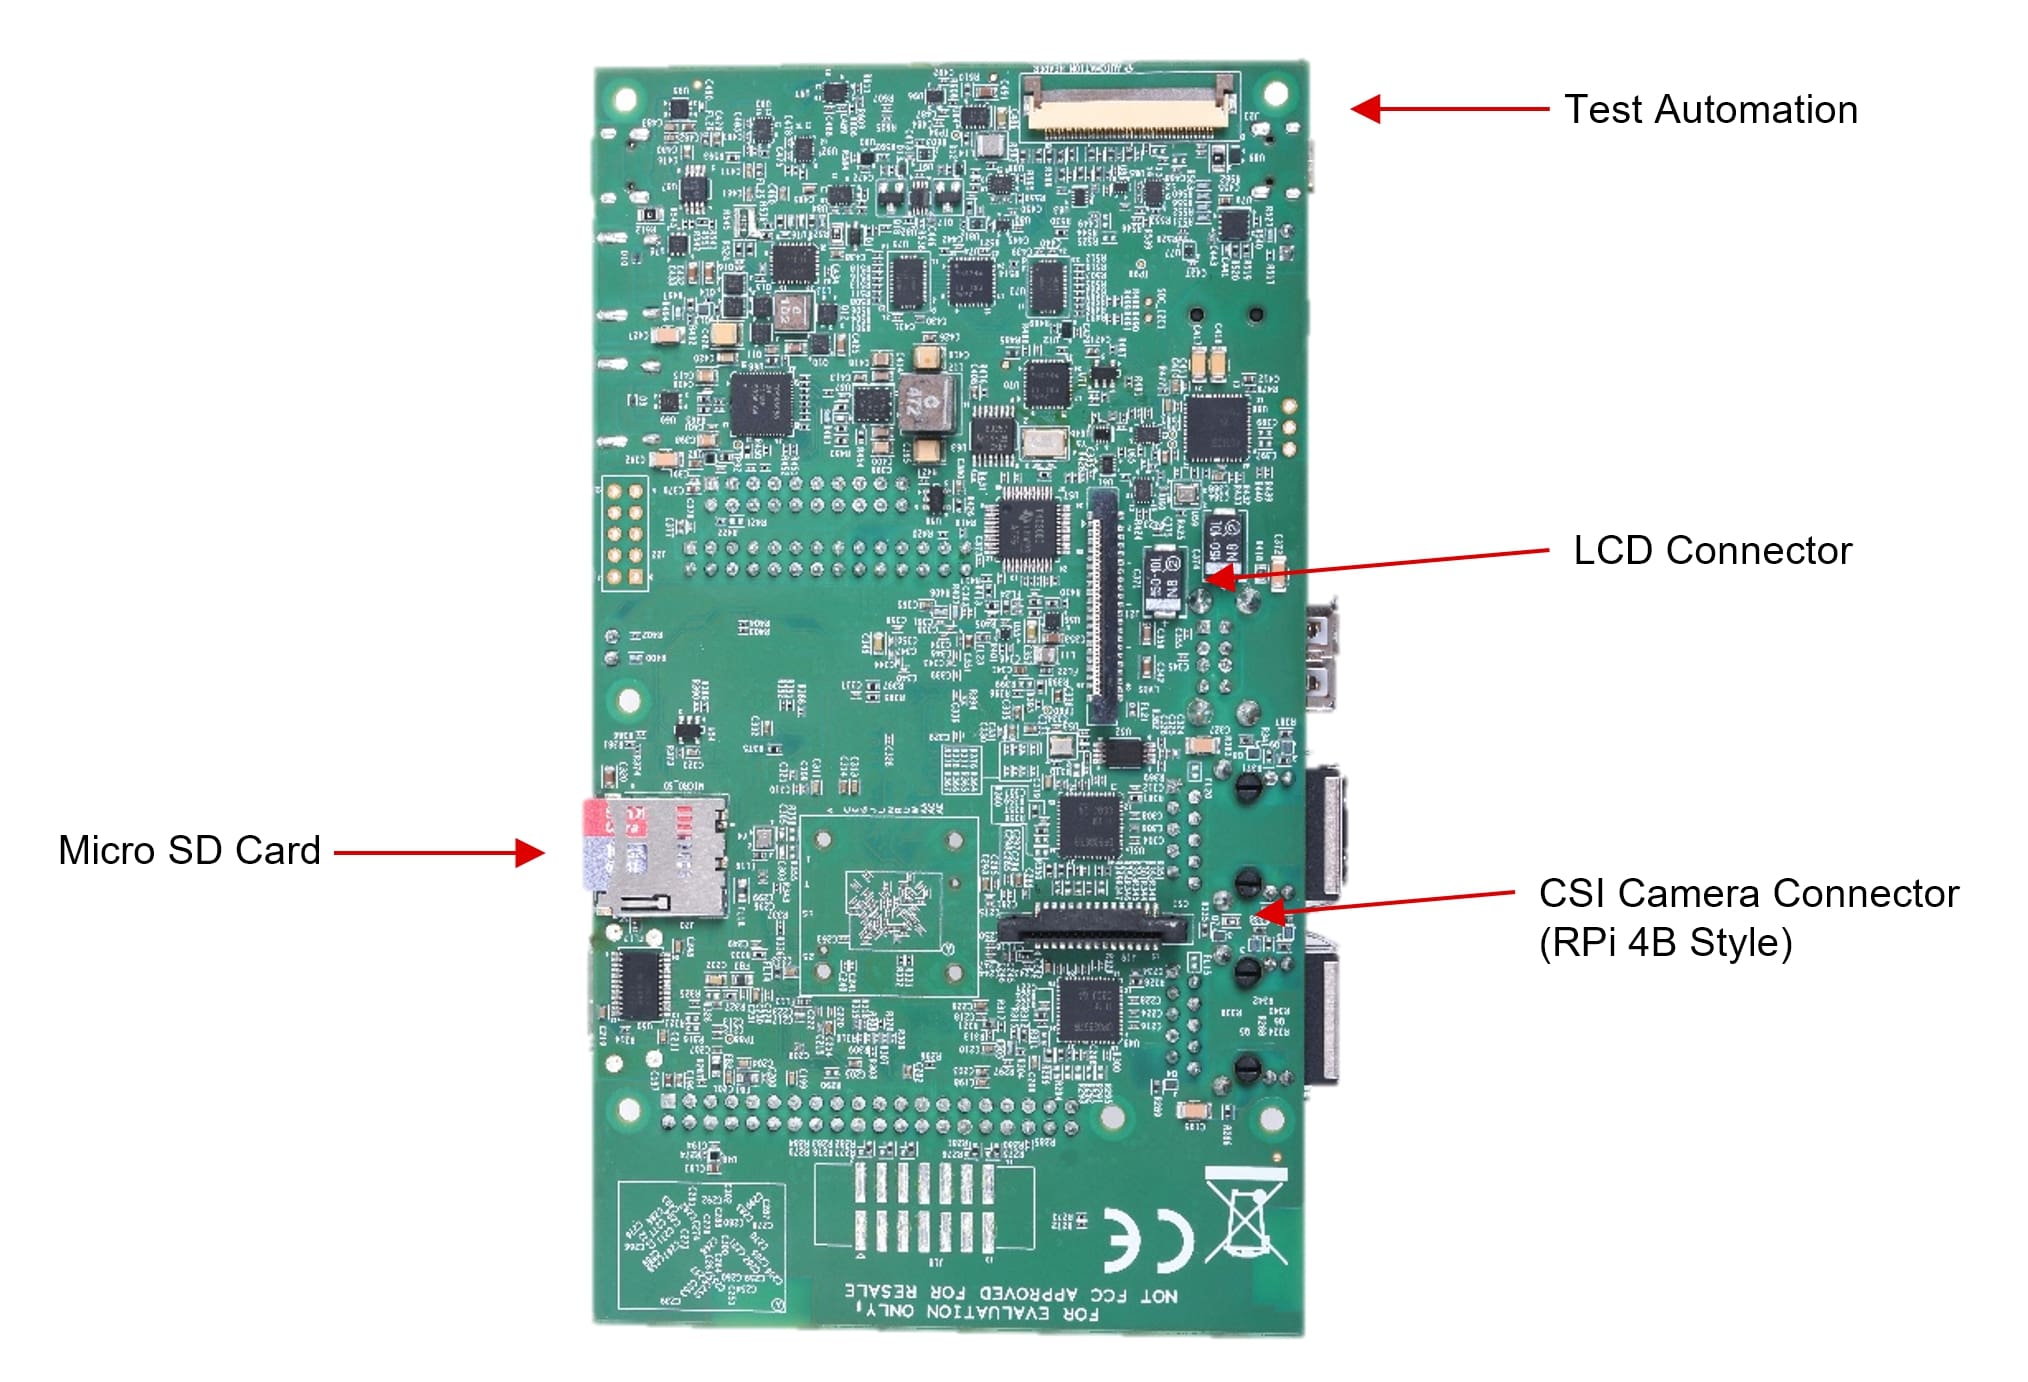
Creating a new blueprint and getting to know a new CPU is not an easy endeavor. For instance, TI only provides a Linux distribution based on Yocto, but we want to use Buildroot. There is no official support for this platform by Buildroot yet, so we will have to do some things on our own. Follow along on our journey to get this platform up and running and creating our new Blueprint! In this first article, you will learn how our team got Buildroot to run on TI’s AM62x development kit.

Goals

In this article, we will try to achieve the following goals:

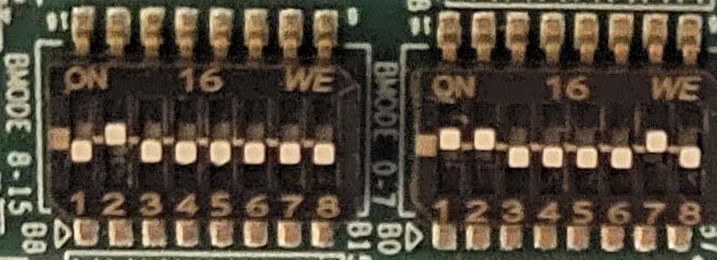
  • boot an image from a SD card
  • create our own SD card image via buildroot
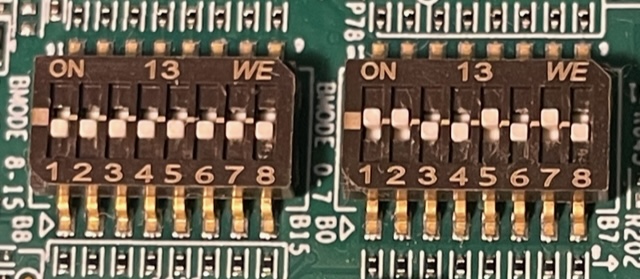
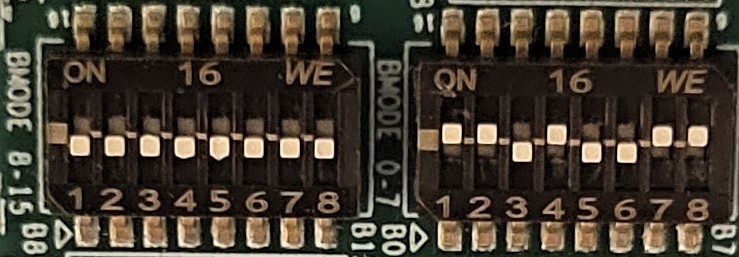
  • flash the external eMMC flash via USB-DFU
  • attempt to boot from the external eMMC flash

The Hardware

We will be using the AM62x starter kit, available at Texas Instruments. This kit serves as a starting point for evaluating and achieving our goals. For detailed information about the starter kit, you can refer to the user guide. To provide a clear visual representation, we have included an image of the development board below, showcasing all the main components.

AM62x Front AM62x Back

(Pictures are provided by Texas Instruments, they are part of the AM62x SK EVM User’s Guide - Copyright © 2023 Texas Instruments Incorporated)

Throughout our exploration, we will be focusing on the following relevant components:

  • Bootmode Selection Switches
  • Micro-USB FTDI UART
  • Micro SD-Card Slot
  • DRD (2.0) USB-C
  • 16GB eMMC

The Bootmode Selection Switches are selecting the appropriate boot mode for the starter kit, ensuring the correct boot up. For logging the boot process and establishing our primary interface with the starter kit, we will rely on the Micro-USB FTDI UART. This interface will enable us to track and analyze the boot process. To store our image, the Micro SD-Card Slot will be utilized. Later on, we will use the DRD (2.0) USB-C interface for flashing the 16GB eMMC via USB-DFU.

Initial Board Bring Up

The initial starter kit bring up can be performed with the provided pre-build image. The instructions on how to flash the image can be found in the SDK documentation. Please note the highlighted notes section in the documentation and rename tiboot3.bin file accordingly. For the correct boot switch positions, please refer to the image below:

AM62x SDcard boot made

A full list of available boot switch options can be found here. Once we have inserted the SD card and powered on the board, we can observe the boot log on the UART. This log will provide us with information about the boot process.

U-Boot SPL 2021.01-g74fc69c889 (May 30 2022 - 16:40:44 +0000)
SYSFW ABI: 3.1 (firmware rev 0x0008 '8.3.2--v08.03.02 (Jolly Jellyfi')
Trying to boot from MMC2
Loading Environment from MMC... *** Warning - No MMC card found, using default environment

Starting ATF on ARM64 core...

NOTICE:  BL31: v2.6(release):08.03.00.003-dirty
NOTICE:  BL31: Built : 16:35:46, May 30 2022

U-Boot SPL 2021.01-g74fc69c889 (May 30 2022 - 16:39:30 +0000)
SYSFW ABI: 3.1 (firmware rev 0x0008 '8.3.2--v08.03.02 (Jolly Jellyfi')
Trying to boot from MMC2


U-Boot 2021.01-g74fc69c889 (May 30 2022 - 16:39:30 +0000)

SoC:   AM62X SR1.0
Model: Texas Instruments AM625 SK
EEPROM not available at 0x50, trying to read at 0x51
Board: AM62-SKEVM rev E3
DRAM:  2 GiB
MMC:   mmc@fa10000: 0, mmc@fa00000: 1, mmc@fa20000: 2
Loading Environment from MMC... OK
In:    serial@2800000
Out:   serial@2800000
Err:   serial@2800000
Net:   eth0: ethernet@8000000port@1
Hit any key to stop autoboot:  0 
switch to partitions #0, OK
mmc1 is current device
SD/MMC found on device 1
Failed to load 'boot.scr'
1490 bytes read in 2 ms (727.5 KiB/s)
Loaded env from uEnv.txt
Importing environment from mmc1 ...
Running uenvcmd ...
1 bytes read in 2 ms (0 Bytes/s)
Already setup.
18448896 bytes read in 734 ms (24 MiB/s)
44485 bytes read in 4 ms (10.6 MiB/s)
## Flattened Device Tree blob at 88000000
   Booting using the fdt blob at 0x88000000
   Loading Device Tree to 000000008fef2000, end 000000008fffffff ... OK

Starting kernel ...

[    0.000000] Booting Linux on physical CPU 0x0000000000 [0x410fd034]

[...]

 _____                    _____           _         _   
|  _  |___ ___ ___ ___   |  _  |___ ___  |_|___ ___| |_ 
|     |  _| .'| . | . |  |   __|  _| . | | | -_|  _|  _|
|__|__|_| |__,|_  |___|  |__|  |_| |___|_| |___|___|_|  
              |___|                    |___|            

Arago Project <http://arago-project.org> am62xx-evm ttyS2

Arago 2021.09 am62xx-evm ttyS2

am62xx-evm login:

AM62x Boot Process

Before we can create our own SD card image with Buildroot, we need to understand the boot process and the files involved. The first step is to examine the SD card image. We will see that the SD card has two partitions: the boot partition and the root partition.

❯ lsblk
NAME        MAJ:MIN RM   SIZE RO TYPE MOUNTPOINTS
sda           8:0    1    58G  0 disk
├─sda1        8:1    1 132,6M  0 part /run/media/$USER/boot
└─sda2        8:2    1   2,8G  0 part /run/media/$USER/root

The root partition contains the kernel and the entire filesystem, while the boot partition contains all the files necessary to boot the Linux kernel, and consequently the operating system. A closer look at the boot partition reveals the following files:

❯ tree /run/media/$USER/boot
/run/media/$USER/boot
├── tiboot3.bin
├── tispl.bin
├── u-boot.img
├── uEnv.txt
└── wificfg

According to the Boot Flow Diagram the boot process starts with the AM6x ROM loading the tiboot3.bin. tiboot3.bin then loads the R5 SPL bootloader, which in turn loads the tispl.bin. tispl.bin then loads the A53 SPL bootloader, which uses the u-boot.img image to start the A53 U-Boot bootloader. Finally, A53 U-Boot loads the Linux kernel and the operating system is started.

The simplified boot flow can be summarized as follows:

AM6x ROM -> tiboot3.bin -> tispl.bin -> u-boot.img -> Linux Kernel
AM6x ROM -> R5-SPL      -> A53 SPL   -> A53 U-Boot  -> Linux Kernel

Adding Buildroot Support

Now it’s time to combine this knowledge and add Buildroot support. Fortunately, we don’t need to start from scratch as TI is already in the process of adding Buildroot support. To accomplish this, we can utilize the patches provided by TI and follow the provided build steps to generate the image. Please also note that we will focus on the GP (General Purpose)build, to reduce the complexity. You can find more information on the different device types here.

# clone the buildroot repository
❯ git clone --branch 2023.05.x <https://github.com/buildroot/buildroot.git>

# download the patch files
❯ curl -s -L <https://e2e.ti.com/cfs-file/__key/communityserver-discussions-components-files/791/buildroot_2D00_am64_2D00_sk_2D00_am62_2D00_sk_2D00_patch_2D00_v9_2D00_22_2D00_jun_2D00_2023.tar.gz> | tar -xvzf - -C buildroot/

# apply patch files
❯ git -C buildroot am *.patch

# build GP image
❯ echo "BR2_TARGET_TI_K3_IMAGE_GEN_SOC_TYPE_GP=y" >> buildroot/configs/am62x_sk_defconfig

# configure buildroot to build the am62x
❯ make -C buildroot am62x_sk_defconfig

# build the sd card image
❯ make -C buildroot

Once Buildroot has finished building, the sd-card.img file can be found in the buildroot/output/images folder. This file can be flashed onto the SD card using the previously described methods. After inserting the SD card and powering on the starter kit, we can observe our board booting up with our newly created image.

U-Boot SPL 2021.01 (Jul 11 2023 - 10:54:39 +0200)
SYSFW ABI: 3.1 (firmware rev 0x0008 '8.6.4--v08.06.04 (Chill Capybar')
SPL initial stack usage: 13424 bytes
Trying to boot from MMC2
Warning: Detected image signing certificate on GP device. Skipping certificate to prevent boot failure. This will fail if the image was also encrypted
Loading Environment from MMC... *** Warning - No MMC card found, using default environment

Starting ATF on ARM64 core...

NOTICE:  BL31: v2.8(release):2023.05-51-gd133e0550e-dirty
NOTICE:  BL31: Built : 10:45:24, Jul 11 2023
I/TC: 
I/TC: OP-TEE version: 2023.05-51-gd133e0550e-dev (gcc version 11.4.0 (Buildroot 2023.05-51-gd133e0550e-dirty)) #1 Tue Jul 11 08:45:19 UTC 2023 aarch64
I/TC: WARNING: This OP-TEE configuration might be insecure!
I/TC: WARNING: Please check <https://optee.readthedocs.io/en/latest/architecture/porting_guidelines.html>
I/TC: Primary CPU initializing
I/TC: SYSFW ABI: 3.1 (firmware rev 0x0008 '8.6.4--v08.06.04 (Chill Capybar')
I/TC: HUK Initialized
I/TC: Primary CPU switching to normal world boot

U-Boot SPL 2021.01 (Jul 11 2023 - 10:46:41 +0200)
SYSFW ABI: 3.1 (firmware rev 0x0008 '8.6.4--v08.06.04 (Chill Capybar')
Trying to boot from MMC2


U-Boot 2021.01 (Jul 11 2023 - 10:46:41 +0200)

SoC:   AM62X SR1.0 GP
Model: Texas Instruments AM625 SK
EEPROM not available at 0x50, trying to read at 0x51
Board: AM62-SKEVM rev E3
DRAM:  2 GiB
MMC:   mmc@fa10000: 0, mmc@fa00000: 1, mmc@fa20000: 2
Loading Environment from MMC... OK
In:    serial@2800000
Out:   serial@2800000
Err:   serial@2800000
Net:   eth0: ethernet@8000000port@1
Hit any key to stop autoboot:  0
switch to partitions #0, OK
mmc1 is current device
SD/MMC found on device 1
Failed to load 'boot.scr'
Failed to load 'uEnv.txt'
19212800 bytes read in 234 ms (78.3 MiB/s)
42219 bytes read in 3 ms (13.4 MiB/s)
## Flattened Device Tree blob at 88000000
   Booting using the fdt blob at 0x88000000
   Loading Device Tree to 000000008fef2000, end 000000008fffffff ... OK

Starting kernel ...

[    0.000000] Booting Linux on physical CPU 0x0000000000 [0x410fd034]
[...]
[    2.852563] wl18xx_driver wl18xx.2.auto: Direct firmware load for ti-connectivity/wl18xx-conf.bin failed with error -2
done
[    2.863382] wlcore: ERROR could not get configuration binary ti-connectivity/wl18xx-conf.bin: -2
[    2.872725] wlcore: WARNING falling back to default config
Saving 256 bits of non-creditable seed for next boot
Starting network: OK

Welcome to Buildroot
buildroot login:

Flashing eMMC over USB-DFU

Now, let’s proceed with flashing the eMMC using USB-DFU. For documentation related to this topic, you can refer to the following links:

Our first step is to create a tiboot3.bin file that supports USB-DFU mode. As the current Buildroot patch series does not currently support building a second standalone tiboot3.bin, we will temporarily need to modify the am62x_sk_defconfig. Below, you can find the necessary modification that needs to be made:

# enable tiboot3.bin with usb-dfu support
❯ sed -i 's/"am62x_evm_r5"/"am62x_evm_r5_usbdfu"/' buildroot/configs/am62x_sk_defconfig

Before rebuilding the tiboot3.bin, it is important to back up the existing file. This backup will be used in the boot process from the eMMC.

# backup old tiboo3.bin
❯ cp buildroot/output/images/tiboot3.bin buildroot/output/images/tiboot3-backup.bin

To rebuild the tiboot3.bin we will need to perform the following steps:

# update config
❯ make -C buildroot am62x_sk_defconfig

# rebuild tiboot3.bin files
❯ make -C buildroot ti-k3-r5-loader-dirclean ti-k3-r5-loader-rebuild ti-k3-image-gen-rebuild

After performing the previous steps, the next task is to configure the boot switches on the starter kit to enable USB peripheral boot mode. Refer to the image below to set the boot switches accordingly:

AM62x dfu boot mode

When the board is powered through the DRD (2.0) USB-C port, it will be detected as a USB device.

❯ sudo dmesg

[618527.385115] usb 3-1.1.1.1.3: new high-speed USB device number 24 using xhci_hcd
[618527.500990] usb 3-1.1.1.1.3: New USB device found, idVendor=0451, idProduct=6165, bcdDevice= 2.00
[618527.500995] usb 3-1.1.1.1.3: New USB device strings: Mfr=1, Product=2, SerialNumber=3
[618527.500997] usb 3-1.1.1.1.3: Product: AM62x DFU
[618527.500998] usb 3-1.1.1.1.3: Manufacturer: Texas Instruments, Inc.
[618527.501000] usb 3-1.1.1.1.3: SerialNumber: 01.00.00.00

Furthermore, it can be discovered using dfu-util:

❯ sudo dfu-util -l

Found DFU: [0451:6165] ver=0200, devnum=25, cfg=1, intf=0, path="3-1.1.1.1.3", alt=1, name="SocId", serial="01.00.00.00"
Found DFU: [0451:6165] ver=0200, devnum=25, cfg=1, intf=0, path="3-1.1.1.1.3", alt=0, name="bootloader", serial="01.00.00.00"

Now, we will be able to upload the tiboot3.bin as well as tispl.bin and u-boot.img. We’ll start by uploading the tiboot3.bin using the following command:

❯ sudo dfu-util -R -a bootloader -D buildroot/output/images/tiboot3.bin --device 0451

Unfortunately, an error occurs when the R5 SPL attempts to boot.

U-Boot SPL 2021.01 (Jul 11 2023 - 11:30:52 +0200)
SYSFW ABI: 3.1 (firmware rev 0x0008 '8.6.4--v08.06.04 (Chill Capybar')
SPL initial stack usage: 13424 bytes
SPL: Unsupported Boot Device!
SPL: failed to boot from all boot devices
### ERROR ### Please RESET the board ###

This issue appears to be a known bug, and it can be resolved by applying the fix mentioned in the workarounds. However, instead of applying the fix, we will take a slightly different approach and be more adventurous by using a newer version of u-boot to bypass this issue. Therefore, we will upgrade to version 09.00.00.001 of u-boot.

# upgrade u-boot version
❯ sed -i 's/ti-u-boot-08.06.00.007/ti-u-boot-09.00.00.001/g' buildroot/configs/am62x_sk_defconfig

If we now repeat the previously described procedure, we will be presented with the following boot log:

U-Boot SPL 2023.04 (Jul 11 2023 - 11:38:07 +0200)
SYSFW ABI: 3.1 (firmware rev 0x0008 '8.6.4--v08.06.04 (Chill Capybar')
SPL initial stack usage: 13392 bytes
Trying to boot from DFU

Let’s proceed further and upload the tispl.bin and u-boot.img files. First, we can verify that the bootloader has presented two new sections where we can upload the files to:

❯ sudo dfu-util -l

Found DFU: [0451:6165] ver=0223, devnum=20, cfg=1, intf=0, path="3-1.1.1.1.3", alt=1, name="u-boot.img", serial="UNKNOWN"
Found DFU: [0451:6165] ver=0223, devnum=20, cfg=1, intf=0, path="3-1.1.1.1.3", alt=0, name="tispl.bin", serial="UNKNOWN"

We can upload the files by performing the steps below:

❯ sudo dfu-util -R -a tispl.bin -D buildroot/output/images/tispl.bin --device 0451
❯ sudo dfu-util -R -a u-boot.img -D buildroot/output/images/u-boot.img --device 0451

This should now trigger U-Boot to start. For reference, the log should resemble the following:

U-Boot SPL 2023.04 (Jul 11 2023 - 11:38:07 +0200)
SYSFW ABI: 3.1 (firmware rev 0x0008 '8.6.4--v08.06.04 (Chill Capybar')
SPL initial stack usage: 13392 bytes
Trying to boot from DFU
################################################DOWNLOAD ... OK
Ctrl+C to exit ...
################################################DOWNLOAD ... OK
Ctrl+C to exit ...
Warning: Detected image signing certificate on GP device. Skipping certificate to prevent boot failure. This will fail if the image was also encrypted
Loading Environment from nowhere... OK
init_env from device 10 not supported!
Starting ATF on ARM64 core...

NOTICE:  BL31: v2.8(release):2023.05-51-gd133e0550e-dirty
NOTICE:  BL31: Built : 10:45:24, Jul 11 2023
I/TC: 
I/TC: OP-TEE version: 2023.05-51-gd133e0550e-dev (gcc version 11.4.0 (Buildroot 2023.05-51-gd133e0550e-dirty)) #1 Tue Jul 11 08:45:19 UTC 2023 aarch64
I/TC: WARNING: This OP-TEE configuration might be insecure!
I/TC: WARNING: Please check <https://optee.readthedocs.io/en/latest/architecture/porting_guidelines.html>
I/TC: Primary CPU initializing
I/TC: SYSFW ABI: 3.1 (firmware rev 0x0008 '8.6.4--v08.06.04 (Chill Capybar')
I/TC: HUK Initialized
I/TC: Primary CPU switching to normal world boot

U-Boot SPL 2021.01 (Jul 11 2023 - 10:46:41 +0200)
SYSFW ABI: 3.1 (firmware rev 0x0008 '8.6.4--v08.06.04 (Chill Capybar')
Trying to boot from DFU
####DOWNLOAD ... OK
Ctrl+C to exit ...

U-Boot 2021.01 (Jul 11 2023 - 10:46:41 +0200)

SoC:   AM62X SR1.0 GP
Model: Texas Instruments AM625 SK
EEPROM not available at 0x50, trying to read at 0x51
Board: AM62-SKEVM rev E3
DRAM:  2 GiB
MMC:   mmc@fa10000: 0, mmc@fa00000: 1, mmc@fa20000: 2
Loading Environment from MMC... OK
In:    serial@2800000
Out:   serial@2800000
Err:   serial@2800000
Net:   eth0: ethernet@8000000port@1
Hit any key to stop autoboot:  0 
MMC: no card present
SD/MMC found on device 1
MMC: no card present
libfdt fdt_check_header(): FDT_ERR_BADMAGIC
No FDT memory address configured. Please configure
the FDT address via "fdt addr <address>" command.
Aborting!
Bad Linux ARM64 Image magic!
=>

From this point onward, we need to configure U-Boot to enable file uploads to the eMMC flash. According to x, we can achieve this by following these steps in U-Boot:

=> env set dfu_alt_info ${dfu_alt_info_emmc}
=> dfu 0 mmc 0

Unfortunately this is not the full story and it will not work as expected and fail during the upload of the rootfs part. To understand why, we would need to examine the dfu_alt_info_emmc variable and what it is doing. The first step is to check the content of the variable.

=> env print dfu_alt_info_emmc
dfu_alt_info_emmc=rawemmc raw 0 0x800000 mmcpart 1;rootfs part 0 1 mmcpart 0;tiboot3.bin.raw raw 0x0 0x400 mmcpart 1;tispl.bin.raw raw 0x400 0x1000 mmcpart 1;u-boot.img.raw raw 0x1400 0x2000 mmcpart 1;u-env.raw raw 0x3400 0x100 mmcpart 1;sysfw.itb.raw raw 0x3600 0x800 mmcpart 1

Device Firmware Upgrade (DFU) describes the content of the dfu_alt_info variable and what its elements are doing. We can see that rootfs access is done via raw partition access rootfs part 0 1 mmcpart 0 while all other partitions are declared as raw mmc device access. This configuration implies that in order to upload a rootfs, a dedicated partition needs to be available for U-Boot to write to. The eMMC flash has three physical partitions (boot0, boot1, and rootfs). This can be observed via the command below.

=> mmc info
Device: mmc@fa10000
Manufacturer ID: 13
OEM: 14e
Name: S0J56
Bus Speed: 200000000
Mode: HS200 (200MHz)
Rd Block Len: 512
MMC version 5.1
High Capacity: Yes
Capacity: 14.8 GiB
Bus Width: 8-bit
Erase Group Size: 512 KiB
HC WP Group Size: 8 MiB
User Capacity: 14.8 GiB WRREL
Boot Capacity: 31.5 MiB ENH
RPMB Capacity: 4 MiB ENH
Boot area 0 is not write protected
Boot area 1 is not write protected

To successfully write to the rootfs partition, it is necessary to have a partition table. This can be achieved using U-Boot and the gpt command. To do so, follow the steps below:

=> env set uuid_gpt_disk 37c84ec5-8cc8-42e6-85d0-dfd0ebde3257
=> env set uuid_gpt_rootf e56d6d53-45ad-4331-944d-7c311283f39
=> gpt write mmc 0 $partitions

Setting the uuid_gpt_disk and uuid_gpt_rootfs variables is necessary because the partitions variable relies on their existence. Please ensure that you set the values of uuid_gpt_disk and uuid_gpt_rootfs appropriately, as they are essential for the proper functioning of the partitions variable.

=> env print partitions
partitions=uuid_disk=${uuid_gpt_disk};name=rootfs,start=0,size=-,uuid=${uuid_gpt_rootfs}

The UUIDs can be generated using tools such as the uuidgen command-line tool. Please note that a reboot may be necessary for the partitions to be fully available. You can verify the partitions by executing the following command:

=> gpt verify mmc 0 $partitions
Verify GPT: success!

The partition table can also be examined using the following command:

=> mmc part

Partition Map for MMC device 0  --   Partition Type: EFI

Part	Start LBA	End LBA		Name
	Attributes
	Type GUID
	Partition GUID
  1	0x00000022	0x01da3fde	"rootfs"
	attrs:	0x0000000000000000
	type:	ebd0a0a2-b9e5-4433-87c0-68b6b72699c7
	guid:	e8be8e22-817f-1640-b82d-e3c79ef7c3eb

Now, we can finally upload all the required files by enabling the DFU-Mode in U-Boot and using the dfu-util to upload these:

=> env set dfu_alt_info ${dfu_alt_info_emmc}
=> dfu 0 mmc 0
# please note that here we use the tiboot3-backup.bin file
❯ sudo dfu-util -a tiboot3.bin.raw -D buildroot/output/images/tiboot3-backup.bin --device 0451

❯ sudo dfu-util -a tispl.bin.raw -D buildroot/output/images/tispl.bin --device 0451
❯ sudo dfu-util -a u-boot.img.raw -D buildroot/output/images/u-boot.img --device 0451
❯ sudo dfu-util -R -a rootfs -D buildroot/output/images/rootfs.ext4 --device 0451

After successfully uploading all the files, we can verify that the rootfs is populated by checking the contents of the rootfs:

=> ls mmc 0
<DIR>       4096 .
<DIR>       4096 ..
<DIR>      16384 lost+found
<SYM>          7 bin
<DIR>       4096 boot
<DIR>       4096 dev
...

Booting from eMMC

Finally, we need to configure U-Boot to boot from the eMMC:

=> env set mmcdev 0
=> env set bootpart 0
=> mmc partconf 0 1 1 1
=> mmc bootbus 0 2 0 0
# in case you want to have the config persistent
=> saveenv

Now, the boot command can be executed, and U-Boot should load the Linux kernel from the eMMC, starting the operating system. Additionally, the boot switches can be configured for eMMC boot, allowing the starter kit to start from the eMMC.

AM62x emmc boot mode

Conclusion

This is it! We ported Buildroot to the new AM62x CPU by Texas Instruments, and used a newer U-Boot version than officially supported in the process. In a later article, we will demonstrate how we developed our very own Blueprint hardware based on the AM62x.

If you require any support with an Embedded project, contact us! Our software and hardware experts are able to support you, from a small microcontroller based project to a full-blown Linux based IoT Edge device.